
|
Watch a short video of this demonstration . . . Go to my list of video links. Introduction Very few of my ninth grade Earth science students understand where electricity comes from . Many know that coal-fired plants and hydroelectric dams are involved, but few understand how the electricity is generated. This demo helps them understand how motion is used to create an electric current. I use the demo after my students have done a lab that helps them understand the formation of wind. The lab is part of the Exploring Convection Lab that is available from WARD's Natural Science Establishment (see hot link below). and learned about local regional, and global wind patterns. Materials (see photo below) 1. a small (about 1 to 1.5 inches in diameter) D. C. electric motor that has lead wires . . . These are available from hobby supply shops and science educational supply companies for $3-$10. The tricky thing here is to find a motor that has permanent magnets inside. Some do not. The needle of a compass will wiggle if moved near a motor that has permanent magnets inside. 2. a ringstand with a round jaw utility clamp . . . to hold the motor (see photo below)) 3. a light emitting diode (LED) . . . These are inexpensive and can be purchased at electronic stores such as Radio Shack. 4. a 1.5 V battery 5. a propeller or fan blade to serve as the turbine . . . I used a plastic fan apparatus from a broken blow-dryer. You may find a propeller at a hobby shop that sells model airplanes. 6. a good blow-dryer Procedures 1. Attach the fan blade to the motor. 2. Put the clamp on the ringstand and then put the motor in the clamp as shown in the photo. 3. Show the students how the motor works by touching the lead wires to the battery. I tell my students that in a motor, these 3 things combine to produce motion: 4. Next connect the LED to the contact points on the back of the motor so that it will stay on without you holding it there. The LED will work only one way, so if it doesn't light up once you get started, reconnect it to the opposite contact points. 5. Darken the room and then position the ringstand so that the students can see the LED. Turn on the blow-dryer and shoot the air (wind) at turbine so that it spins. 6. Here these three combine to produce electricity: Any time a magnet it moved next to a wire (or vice versa), a current will be generated in the wire. For Discussion 1. In Montana our electricity is generated at coal-fired plants and hydroelectric dams at a cost of about 8-9 cents per kilowatt-hour. ( One kilowatt-hour is the amount of electricity needed to keep a 100-watt bulb on for 10 hours.) In comparison, early wind generators (1970s) produced electricity for about 50 cents per kilowatt-hour. Over the past few decades, improvements in technology have reduced this cost to less than 10 cents per kilowatt-hour, making it competitive with other types of electricity. This coupled with the fact that wind energy would not contribute to global warming, make wind power a viable option for the 21st century. 2. Following the demo, I show my students a map that identifies locations where the potential for wind energy is greatest. Click here to see the map. I ask them to offer theories about why various areas have so much potential. This shows the LED connected to the back of the generator (motor). As the wind (blow-dryer) blows, the fan will turn, and the LED will light up. The bright circular area in this photo was caused by the flash from my camera. 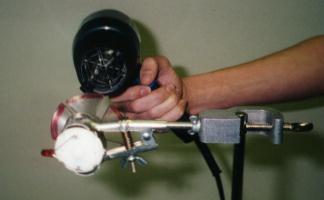 |
 |
Back to RODNEYS HOMEPAE for Earth Science Teachers |
|
Take a look at the Convection Labs |
| s: |